Looking for Lightroom tips and tricks to improve your workflow, increase your speed, and enhance your edits? You’ve come to the right place.
I’ve been using Lightroom for over a decade, and in this article, I share my top advice for amazing results, including:
- The panel that everyone should use for beautiful, artistic edits
- An easy way to apply complex edits at high speeds
- The best tools for creating fine-tuned, professional effects
Let’s do this!
1. Create color harmonies using the HSL panel
If you’ve never worked with the Lightroom HSL panel, then you’re in for a treat. It’s a little option hidden underneath the Tone Curve that looks like this:

The panel works by targeting different colors independently. You can choose to tweak only the reds in an image; you can brighten only the greens; you can desaturate only the blues. You simply pick the corresponding color slider, then make the necessary adjustments.
Note that the HSL panel lets you adjust colors in three specific ways. You can:
- Change color hues. You can make the reds more orange, the purples more pink, or the blues more green.
- Change color saturation. You can make the blues more faded or the reds more intense.
- Change color luminance. You can brighten up the greens, darken down the blues, or brighten up the yellows.

When you’re just starting out, I’d recommend simply experimenting with the different sliders until you get an effect that you like, but here are a few ideas to try:
- Remove all the cool colors from an image for a warm, cinematic look
- Saturate the color of the main subject while desaturating the colors in the background
- Push several different colors in the same direction for a simpler color palette (and a more harmonious result)
This image, for instance, features a warm color palette (which can be achieved by desaturating blues, greens, and magentas:

2. Try the automatic slider adjustments
Sometimes, it can be hard to know how to start (or continue) a Lightroom edit.
In such cases, I recommend a simple little trick:
Hold down the Shift key, then double click on the sliders in the Basic panel. Lightroom will analyze your image, then apply adjustments automatically.

No, the edits won’t always be perfect, but they often look nice – and if you hate the result, you can always double-click on the slider name to set it back to zero. Plus, you can always use the automatic settings as starting points, then edit from there.
By the way, if you want to see all of Lightroom’s automatic edits at once, just click the Auto button above the Exposure slider:

It’ll instantly adjust the sliders in the Basic panel!
Now, these automatic adjustments don’t work for all Lightroom sliders. They won’t work outside the Basic panel, and they won’t work on the Texture, Clarity, and Dehaze sliders.
But you can use it to automatically adjust the white balance, the exposure, the contrast, and even the saturation – so why not give it a try and see what you think?
3. Use the clipping masks (or the clipping warnings)
Clipping refers to a loss of detail in the highlights and/or the shadows of an image – and in general, clipping is pretty bad.
Unfortunately, it can be difficult to tell whether you’re actually clipping details while editing, and it’s possible to exacerbate clipping issues by pushing your sliders too far without realizing it. You can always keep an eye on the histogram, but it can be difficult to interpret, especially for beginners.
Fortunately, Lightroom has a solution: The clipping masks, which clearly indicate clipping in real-time.
Before you adjust the Exposure, Highlights, Shadows, Whites, or Blacks slider, simply hold down the Alt/Opt key. Then, when you increase or decrease the sliders, you’ll see a white or a black overlay, like this:

A mask that reveals zero clipping will be all white or all black. But a mask that shows some clipping will change colors over the problem areas:
(Note that, when adjusting the Blacks or the Shadows, clipping is indicated as color on white. On the other hand, when adjusting the Exposure, the Whites, or the Highlights, clipping is indicated as color on black.)
As long as you have no clipping, you’re good to go – but as soon as you start to see a loss of detail, you’ll want to dial back the intensity of your edits. Make sense?
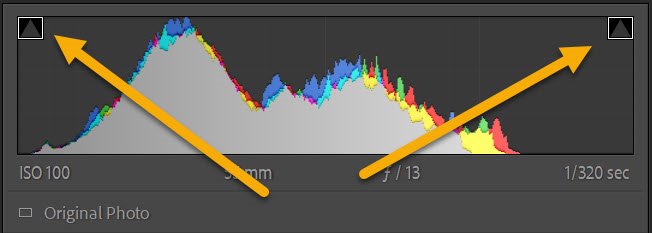
One more quick Lightroom tip: If you want to identify clipping but you don’t want to spend time looking at the masks, you can always click the arrows at the top of the histogram:

This will activate the clipping indicators, which will cause clipped shadows to turn blue and clipped highlights to turn red:

4. Use the copy-paste shortcut to speed up your workflow
Say you’re editing a large volume of photos from an event, a wedding, or a portrait photoshoot. You need to move through the photos quickly, so you don’t want to edit each file individually.
You could create presets, but each one takes time to produce, and if the presets are photoshoot-specific, you may never use them again.
Instead, why not use Lightroom’s copy-paste option?
You see, after you edit an image, you can always select Edit>Copy (or press Ctrl/Cmd+C). A window will pop up, asking you which settings you want to copy:

Then, once you’ve chosen the relevant settings, select your to-be-edited photos, then choose Edit>Paste (or press Ctrl/Cmd+V).
The settings from your original photo will be pasted onto the selected images, and your editing work will be done!
This can be a great way to handle complex photoshoots. For instance, if you captured images in multiple types of light, you might edit the first front-lit image, copy the settings, and paste them across all the remaining frontlit images. You could do the same for the backlit images, the shaded images, and so on – and if you require even more control over your results, you can make slight adjustments to your settings as you go, then copy again and paste as required.
I do have one recommendation, though:
Even if you think you’ve done a successful copy-paste job, quickly go through the edited images and make sure everything looks okay. You don’t want to send images to a client, only to realize that you cropped all the files by accident!
Lightroom offers a handful local adjustment options – referred to as masking tools – and they are insanely powerful. You can find them toward the top of the editing panels, just underneath the histogram:

Unlike global adjustments, which affect the entire image, local adjustments only change a portion of a file.
So while you can brighten up an entire image using the Exposure slider, you can brighten up just the foreground using a local adjustment; while you can sharpen the entire image using Lightroom’s Detail sliders, you can sharpen only the main subject using a local adjustment. They’re a great way to create fine-grained, detailed edits that add depth, enhance color, and push the viewer’s eye toward the main subject.
I like to use local adjustments for all sorts of things, but here are a few ideas:
- Use a Radial Gradient to add a vignette (i.e., a darkening effect) around the edges of the frame
- Use a Radial Gradient to boost the exposure of the main subject
- Use a Linear Gradient to decrease the exposure and increase the contrast in the sky
- Use a Linear Gradient to darken the foreground
 Here, a Linear Gradient is being applied to the image foreground.
Really, when it comes to local adjustments, the sky is the limit. Feel free to use the suggestions I provided above, but also make sure you experiment. That way, you’ll get a deep sense of how the masking tools work and what they can do for your photos!
Lightroom tips and tricks: final words
Well, there you have it:
Five tips to take your Lightroom editing to the next level.
So try out these suggestions. See how you like them. And let us know in the comments how they work out!


 English (US) ·